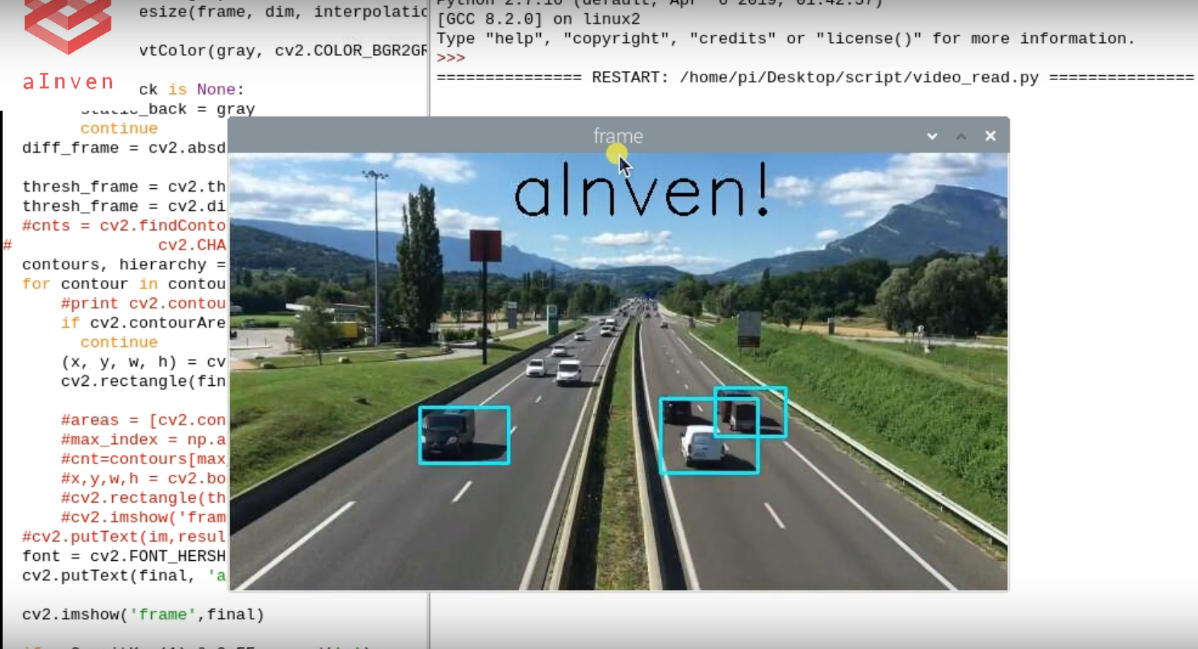
Moving object detection using machine learning
In this article, I will explain how to detect moving objects track using OpenCV python from the video. you can use saved video or live camera feed too. you can switch to USB camera or saved video using a simple command.
How ever, I will give a simple introduction for the OpenCV and some of the function in the code
Let’s discuss the code.
1. Import Library
import numpy as np
Numpy is the package.its is for handle numerical operation.it is looks like normal arrays. this NumPy array is a multi-dimensional one.it can handle deep numerical operations
import cv2
Opencv is a library use for image processing. This library is compatible with C++,python and more language
2. Load dataset
cap = cv2.VideoCapture('hiway.mp4')
cap = cv2.VideoCapture('hiway.mp4')
Let’s read the saved video file. Using this command you can access saved video files in your computer.you can save the video files in your root folder and call to video file. however you can read live video from USB too.
3. Read until end
while(cap.isOpened()):
while(cap.isOpened()):
That means you can read until your video end
4. Take a shot
ret, frame = cap.read()
ret, frame = cap.read()
Using this command you can take a single frame from the video. the frame will save in frame variable
5. Reszie frame
scale_percent = 50 # percent of original size

width = int(frame.shape[1] * scale_percent / 100)

height = int(frame.shape[0] * scale_percent / 100)

dim = (width, height)

gray = cv2.resize(frame, dim, interpolation = cv2.INTER_AREA)
scale_percent = 50 # percent of original size
width = int(frame.shape[1] * scale_percent / 100)
height = int(frame.shape[0] * scale_percent / 100)
dim = (width, height)
gray = cv2.resize(frame, dim, interpolation = cv2.INTER_AREA)
ok. now I am going to rescale frame. because bigger your video frame much larger, CPU takes much time to process all of the pixels in your frame.
in this case I will reduce my original frame size by 50%. it’s good enough for the good final result.
6. Convert to gray
gray = cv2.cvtColor(gray, cv2.COLOR_BGR2GRAY)
using this command we can convert RGB frame into the grayscale image. normally our original frame contain red, blue, green colours. using OpenCV cv command, you can convert into the various types of color type. as an example gray scale and HSV. HSV means hue, saturation and value. You can get more detail by clicking below link
7. Add filters
diff_frame = cv2.absdiff(static_back, gray)
thresh_frame = cv2.threshold(diff_frame, 50, 30, cv2.THRESH_BINARY)[1]
now we can apply the threshold value. after that, we can separate the new frame. that frame some pixel value may change due to threshold filtering
<
thresh_frame = cv2.dilate(thresh_frame, None, iterations = 0)
In this command increase the size of the detected object. see below image for better understanding.

Now you can see the 1st image is the original one. The second image is the output after dilate effect
8. Search boundry
contours, hierarchy = cv2.findContours(thresh_frame.copy(),cv2.RETR_TREE,cv2.CHAIN_APPROX_SIMPLE)
see here, this line will be the most important command in the code. because this command search detected object in the frame. after that save the all of boundary location as the contours.
10. Skip noise
for contour in contours:

      if cv2.contourArea(contour) < 500 or cv2.contourArea(contour) > 10000:

        continue
if cv2.contourArea(contour) < 500 or cv2.contourArea(contour) > 10000:
continue
Then you should skip the noise from the frame. for that, I will skip smaller objects from the frame.
11. Draw lines
 (x, y, w, h) = cv2.boundingRect(contour)

  cv2.rectangle(final, (x, y), (x+w, y+h), (255, 255, 12), 2)
cv2.rectangle(final, (x, y), (x+w, y+h), (255, 255, 12), 2)
Now we can draw lines between objects. for that, I will use start points of X, Y coordinates as x,y and height, and width as w,h of the object
(255, 255, 12) mean colour of the line. this is RGB values. you can change it 0 to 255 2 mean line width.
 font = cv2.FONT_HERSHEY_SIMPLEX

  cv2.putText(final, 'aInven!', (230, 50), font, 2, (0, 0, 0), 2 )
this is for draw text on your frame. you can change font name, font size and fond colour as well. (230,50) mean start location of your text. this is can change 0 to your frame width and height. (0,0,0,) mean font colour. define as RGB values. it can change 0 to 255 each. 2 mean font size.
11. Show final
cv2.imshow('frame',final)
This is your final output. using this command you can show your final output.
12. Terminate script
  if cv2.waitKey(1) & 0xFF == ord('q'):

    break
break
if you want to exit from the script, you can press q in the keyboard for it
cap.release()

cv2.destroyAllWindows()
Finally, you need to release all recourse that you use after terminate your script
Final Gift
import numpy as np
import cv2
cap = cv2.VideoCapture('hiway.mp4')
#set the width and height
static_back = None
while(cap.isOpened()):
  ret, frame = cap.read()
  scale_percent = 50 # percent of original size
  width = int(frame.shape[1] * scale_percent / 100)
  height = int(frame.shape[0] * scale_percent / 100)
  dim = (width, height)
  gray = cv2.resize(frame, dim, interpolation = cv2.INTER_AREA)
  final=gray
  gray = cv2.cvtColor(gray, cv2.COLOR_BGR2GRAY)

  if static_back is None:
        static_back = gray
        continue
  diff_frame = cv2.absdiff(static_back, gray)

  thresh_frame = cv2.threshold(diff_frame, 50, 30, cv2.THRESH_BINARY)[1]
  thresh_frame = cv2.dilate(thresh_frame, None, iterations = 0)
  #cnts = cv2.findContours(thresh_frame.copy(), cv2.RETR_EXTERNAL,g
#		cv2.CHAIN_APPROX_SIMPLE)
  contours, hierarchy = cv2.findContours(thresh_frame.copy(),cv2.RETR_TREE,cv2.CHAIN_APPROX_SIMPLE)
  for contour in contours:

      if cv2.contourArea(contour) < 500 or cv2.contourArea(contour) > 10000:
        continue
      (x, y, w, h) = cv2.boundingRect(contour)
      cv2.rectangle(final, (x, y), (x+w, y+h), (255, 255, 12), 2)
      #areas = [cv2.contourArea(c) for c in contours]
      #max_index = np.argmax(areas)
      #cnt=contours[max_index]
      #x,y,w,h = cv2.boundingRect(cnt)
      #cv2.rectangle(thresh_frame,(x,y),(x+w,y+h),(0,255,0),2)
      #cv2.imshow('frame2',thresh_frame)
  #cv2.putText(im,result,(x,y), font, 1, (200,0,0), 3, cv2.LINE_AA)
  font = cv2.FONT_HERSHEY_SIMPLEX
  cv2.putText(final, 'aInven!', (230, 50), font, 2, (0, 0, 0), 2 )

  cv2.imshow('frame',final)

  if cv2.waitKey(1) & 0xFF == ord('q'):
    break

cap.release()
cv2.destroyAllWindows()

